
How to configure Dance Master Pro in 5 simple steps
Dive into our guide showcasing how Dance Master Pro streamlines dance school management, making your workflow smooth and efficient.
Step 1 – Initial Setup
Step 2 – Academy Configuration
Step 3 – Students Setup
Step 4 – Revenues Registration
Step 5 – Costs Tracking
Once you have mastered the basic configurations, you can enhance your application with Advanced Settings such as:
- Dashboard and reporting
- Attendance tracking
- Online payment setup
- Invoice / Receipt management
- Customer portal
- Choreography management
- Library management
- Events management
Step 1 – Initial Setup
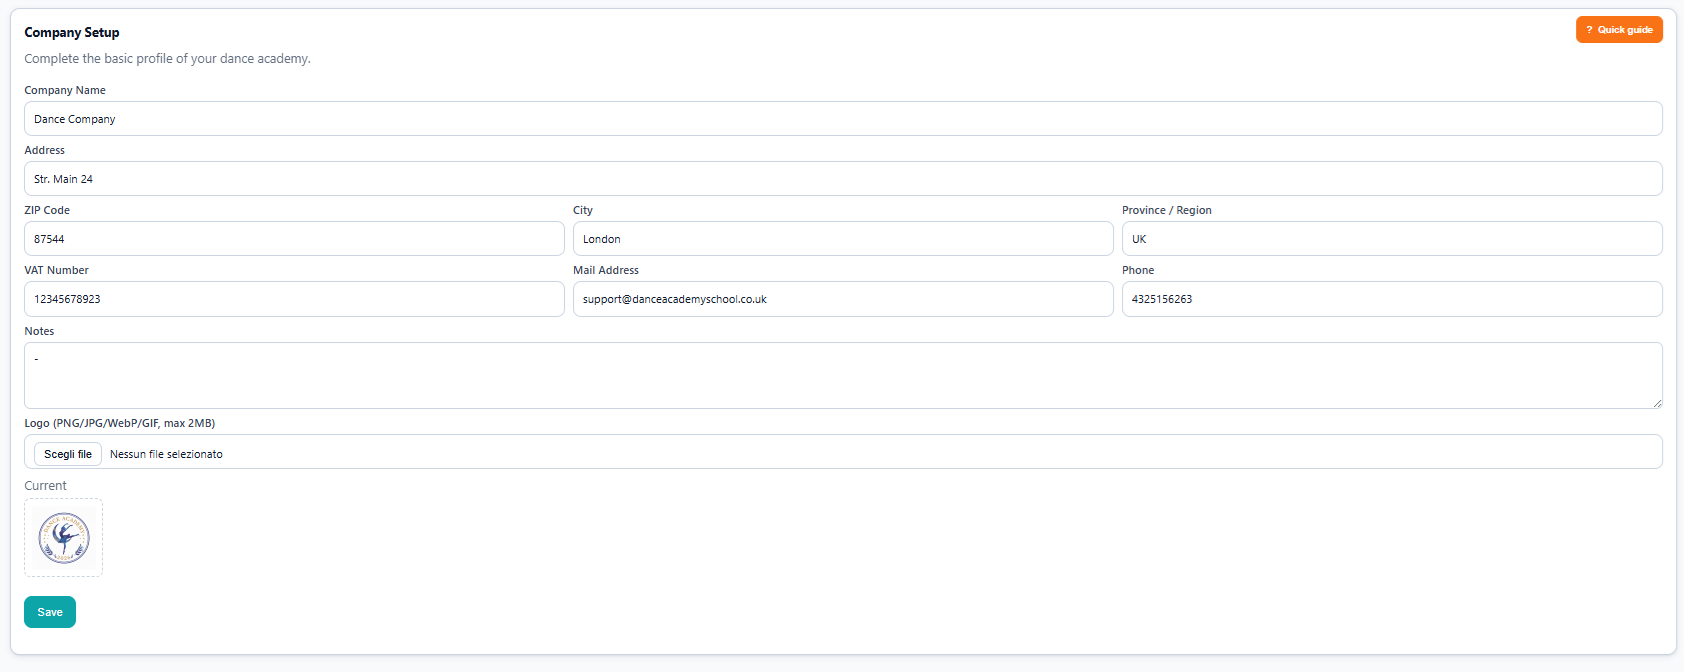
You can access to the application page via web browser at the following link page: https://academy.dancemasterpro.com. During your first login, you need to set up basic information in Academy Configuration under Company Setup.
Next, define all the locations where your school operates in Academy Configuration under Locations. Click the New button to add a new location.
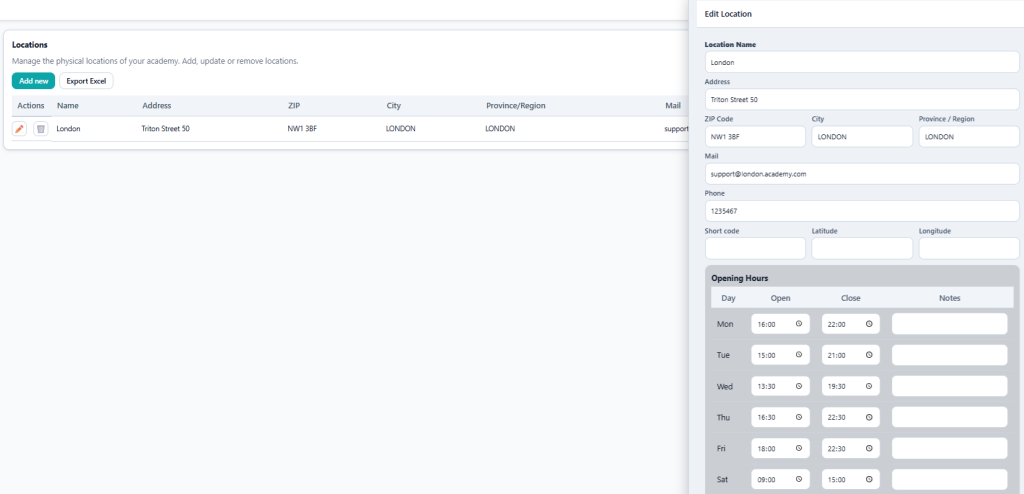
👉The Opening Hours table sets the schedule for the calendar in Step 2. If left empty, the planner will display a full 24-hour day, from 0 to 24 hours.
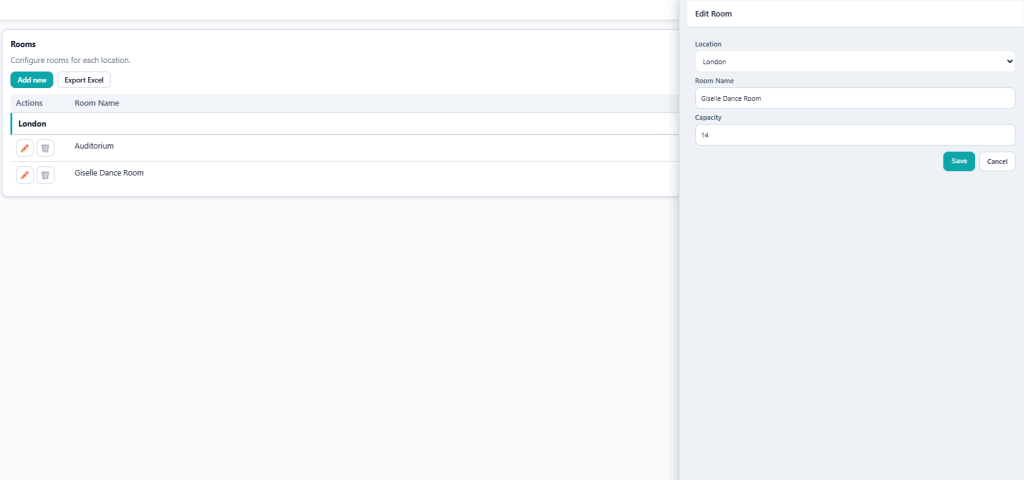
You can now create all the dance rooms for each location within Academy Configuration – Rooms. Press New to create a new room.
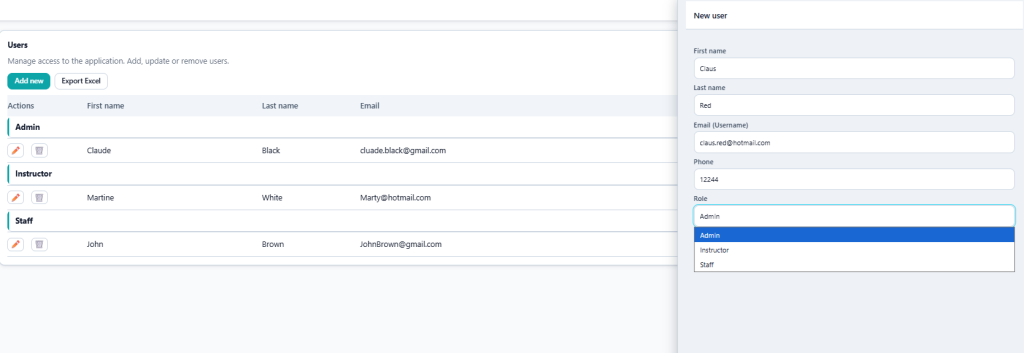
To allow multiple users to access Dance Master Pro, you can create new user accounts, assign their roles within the school, and send them a password reset link via email. The platform offers three role options:
Admin: The superuser with full access. You can access all features and pages within the application and have the ability to create new users.
Instructor: You can access MY HOME (My Profile – My Agenda) and COURSES (Attendance – Choreographies – Library)
Staff: You can access MY HOME (My Profile – My Agenda) and COURSES (Instructors and Staff – Courses – Planning & Scheduling – Students – Enrollments – Attendance – Choreographies – Library)
Now we can complete Step 1 by finalizing the basic part of the Settings page. Navigate to Others – Settings. You will see multiple options, but for now, let’s focus on setting up the following points:
Fiscal Year Start Date: This marks the first day of your fiscal year and is used throughout the Dashboard. For example: January 1st
Academy Year Start Date: This marks the first day of your Academy Year and is used throughout the Dashboard. For example: September 1st.
Currency: Choose your local currency. This setting will be applied throughout the entire website.

Step 2 – Academy Configuration
Now you’re ready to set up your staff team – classes and scheduling. Go to Courses – Instructors & Staff. On this page, you can populate your staff.
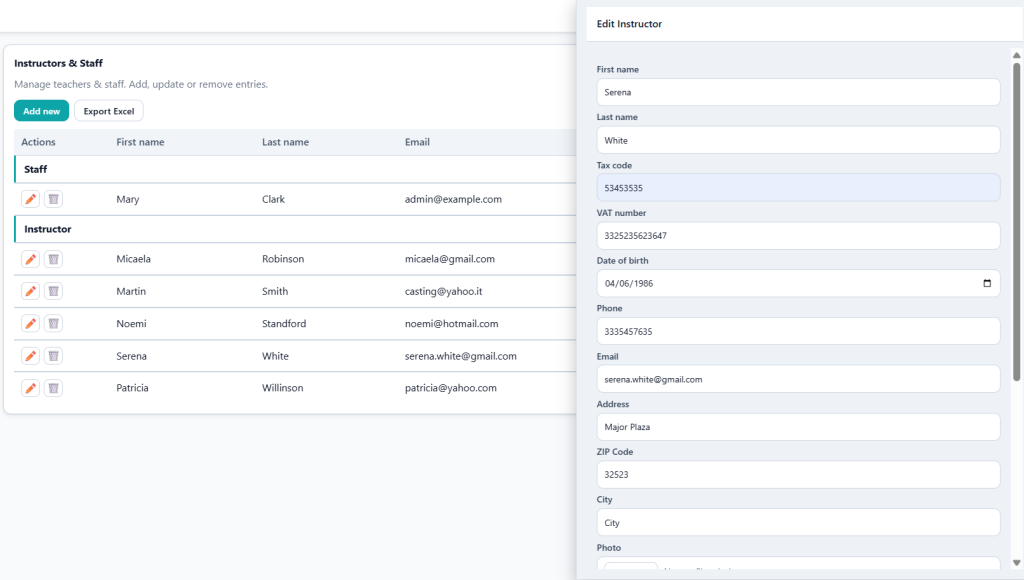
👉The Hourly Cost is essential for automating staff payments based on the daily report.
Once the staff setup is complete, you can proceed to create your classes by navigating to Courses – Courses.
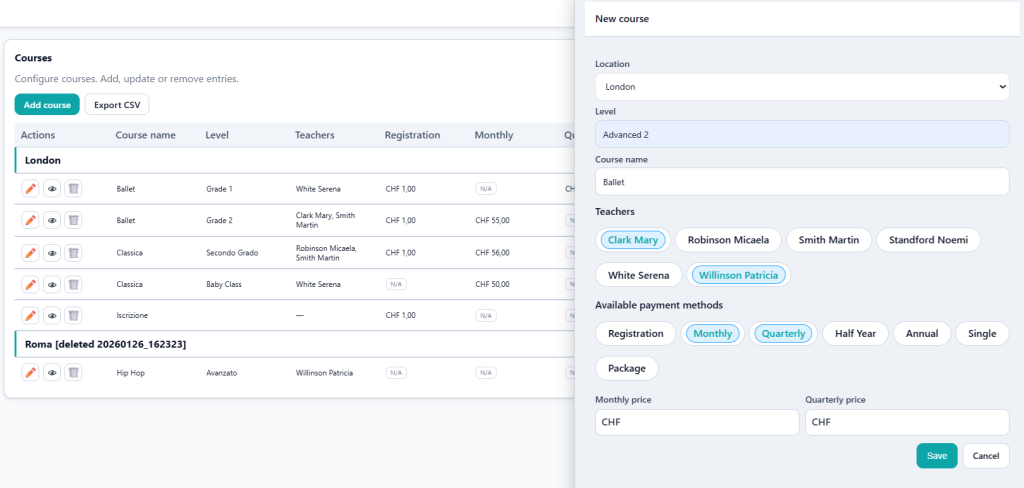
👉 You can assign one or more instructors to a single course. This information will be used to track lesson attendance and manage staff payments.
👉Each course can have one or more payment options as follows:
- Registration: A one-time fee to join the course.
- Monthly: A monthly fee for the entire duration of the classes (start and end months are defined in the scheduling step), e.g., February, March, etc.
- Quarterly: A quarterly fee covering the full duration of the classes (start and end months are defined in the scheduling step), e.g., Quarter 1 (January to March), Quarter 2 (April to June), Quarter 3 (July to September), and Quarter 4 (October to December).
- Half Year: Payment split into two periods, H1 (first half of the year) and H2 (second half of the year).
- Annual: A single rate for the entire year.
- Single: A fee per individual lesson, typically used for private lessons or coin-based systems where students can purchase one or multiple lessons.
- Package: A bundled fee for a set of lessons, often used for stages, webinars, or other cases where students purchase a package as a single bundle.
💡For an Academy Single Registration Fee valid for all classes throughout the year, we recommend creating a course called “Annual Registration” with a Registration payment option. This approach keeps the registration fee separate from individual courses.
Once you have created the courses, you can schedule the lessons using the calendar. Navigate to Courses – Planning & Scheduling. Here, you can set up the calendar for all dance rooms across any locations you have previously created. Select the Location and Room, then simply drag and select the desired timeslot. A pop-up will appear, allowing you to choose the course name and configure any recurrence (e.g., every Monday from 6 PM to 8 PM, from September to May).
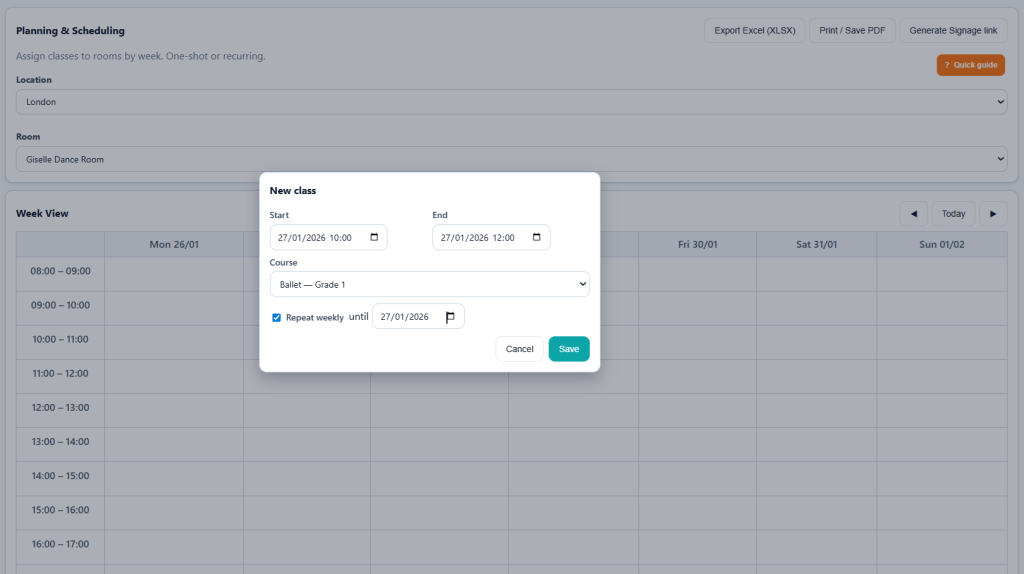
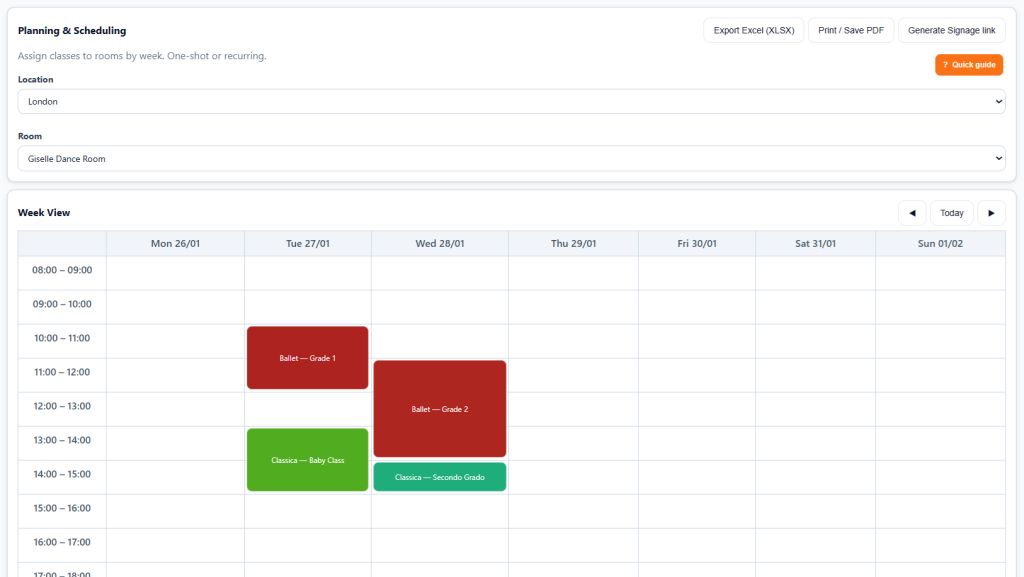
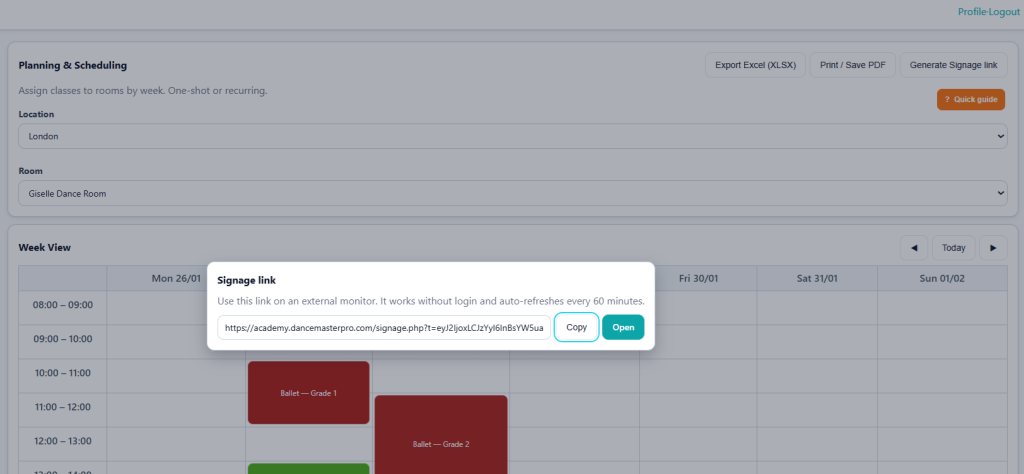
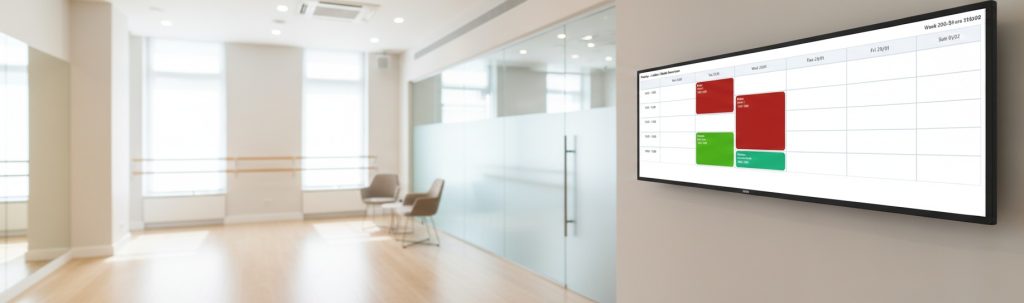
💡If you have a monitor in the location where you want to publish your weekly calendar of the room you can generate a web link by using the button in the right corner “Generate Signage Link”. The pop up will share with you a web link you can use from any monitor with a web browser internet connected. This planner is autorefreshed every 60 minutes.
Step 3 – Students Setup
In this step, we will guide you through manually creating your student database, setting up enrollment in the back office, and enabling automatic enrollment of student profiles and course registrations through online enrollment. We will also cover how to monitor certificate management and track attendance during lessons.
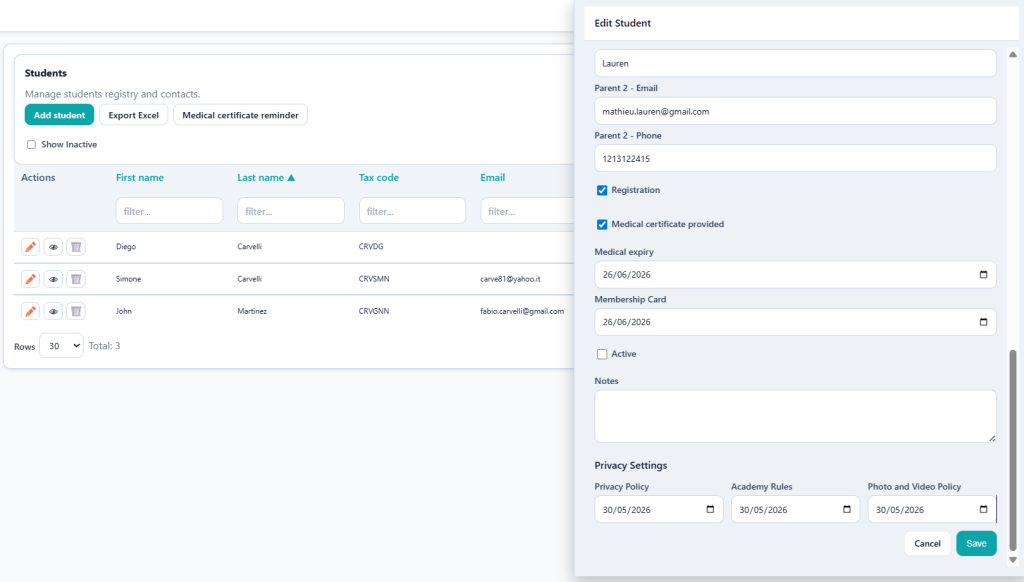
First, student information is available under Courses – Students. Here, you can view existing students or add new ones. Each student’s profile includes the following details:
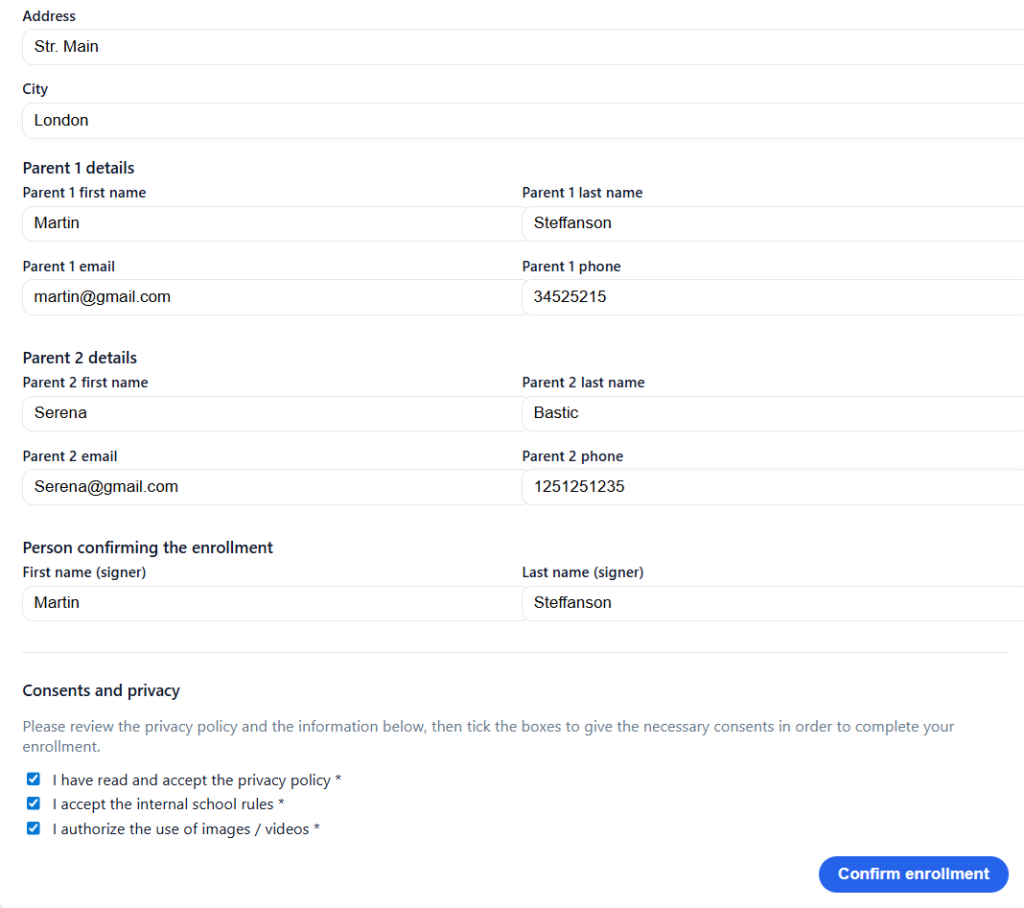
- Personal Information (i.e Name / Surname…). Be aware that this mail address will be used for main commuinications
- Parent 1 Information (i.e Name / Surname…). Be aware that this mail address will be applicable for Student Web Portal.
- Parent 2 Information Be aware that this mail address will be applicable for Student Web Portal.
- Registration Module.
- Medical Certification Information, including status and expiration date
- Membership Card Expiration Date
- Status: Active (current student) or Not Active (former student no longer attending)
- Privacy Acceptance Dates for the three main privacy categories: Privacy Policy, Academy Rules, and Photo and Video Policy
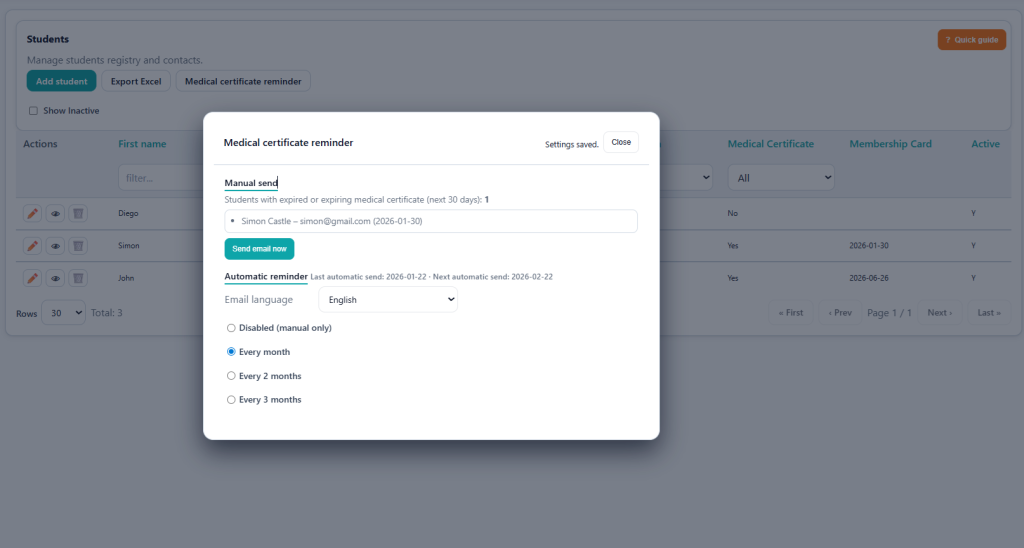
👉 Certificate Management: The application monitors the expiration dates of active students’ certificates and allows you to send manual reminder emails or automate the process with scheduled notifications sent monthly. Navigate to Medical Certificate Reminder to view the current list of students who have not provided a certificate (checkbox disabled in student details) or whose certificates are expired or expiring within the next 30 days. You can send a manual reminder or configure automatic reminders to be sent every month, every two months, or every three months
Manual Enrollment: Search for an existing student by Name, Surname, or Email Address. Then, enroll the student in one or more classes and set the appropriate payment terms. Once completed, you can Confirm the Enrollment or Request Online Confirmation from the student via email.
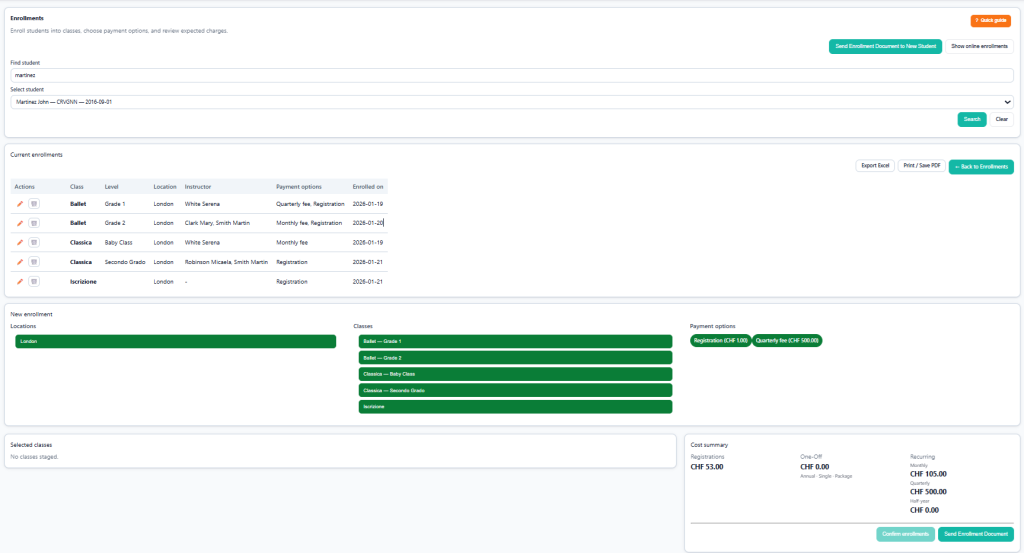
👉 Summary of Costs: View the estimated revenue expected from this student based on selected courses and planning instantly.
Existing Student Enrollment: Search for an existing student by Name, Surname, or Email Address. Enroll the student in one or more classes and specify the payment terms. Once finished, you can either Confirm the Enrollment or Send an Online Confirmation Request to the student via email.
- Confirm Enrollment: The student is assigned to the appropriate class, and the expected payments are now reflected in Student Payments.
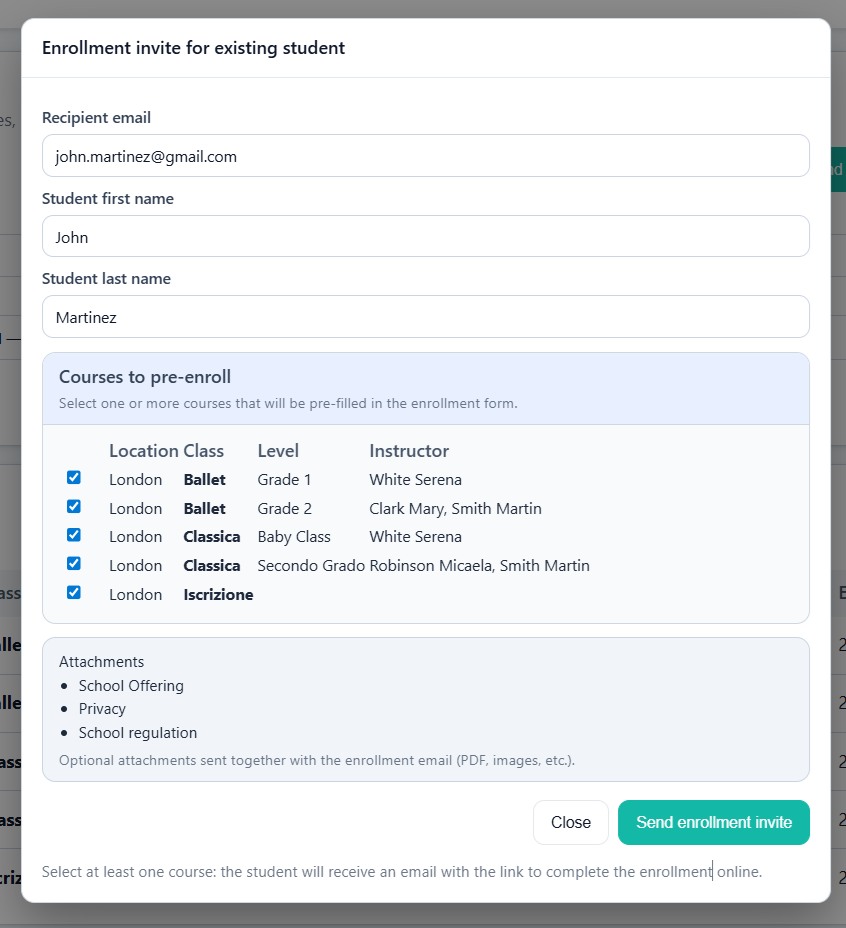
- Send Enrollment Document: An email is sent to the student’s email address containing a form where they can confirm their classes, verify personal information, receive school documents (such as school regulations, privacy policies, or other relevant materials), and accept the privacy terms online.
This is the Enrollment Confirmation Pop-up
This is the email received from your student.
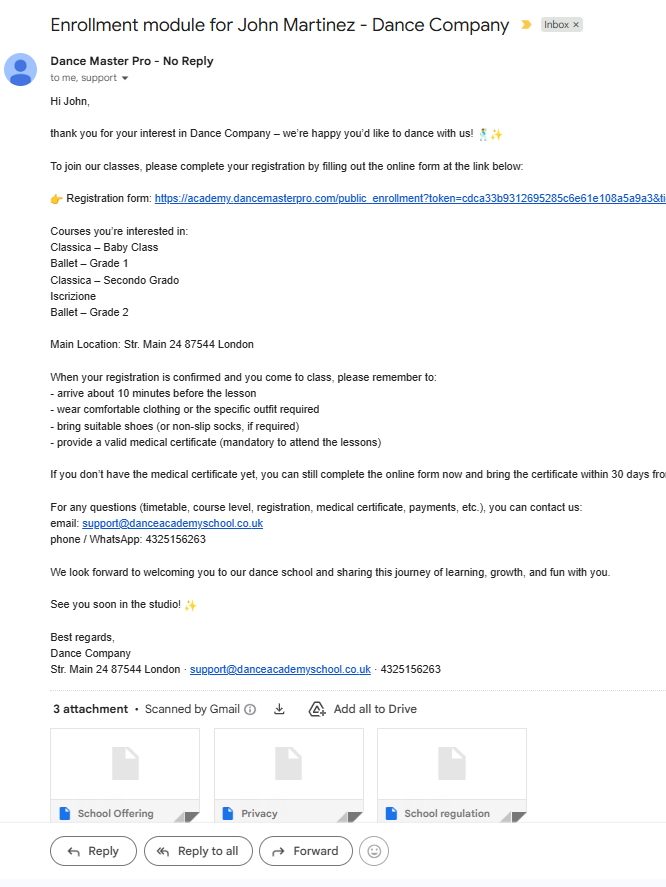

Through the link, students can review and update their personal and parent information, confirm their selected classes, accept the privacy policy, and finalize their enrollment. See below the last part of the online module.
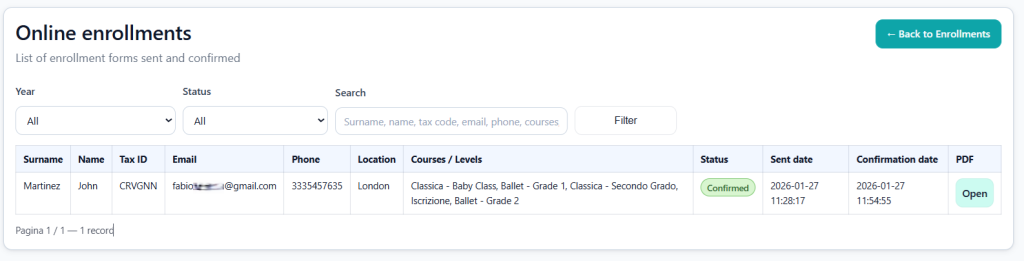
Once enrolled, you will receive email notifications about new enrollments. You can view enrollment details by navigating to Course – Enrollments – Show Online Enrollments. All information is stored in the student’s profile and automatically assigned to the appropriate class and payment records.
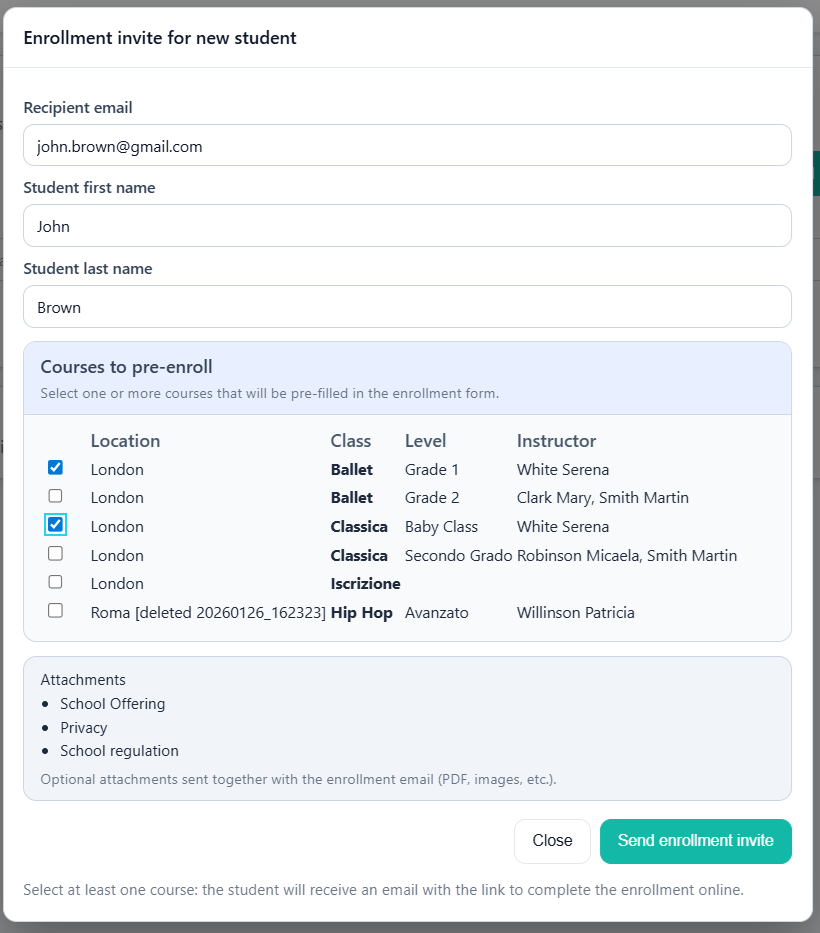
New Student Online Enrollment: If you are enrolling a new student without their personal details, simply request the student’s Name, Surname, and Email Address for the new online enrollment. The new student will receive an email where they can complete all required information in the online form. Once enrolled, they will be automatically assigned to the appropriate class and payment schedule.
👉 Attachment Management: The documents you attach to an enrollment are fully customizable. Simply go to Settings – Enrollment PDF Attachments section and upload the PDF files you want to include with any enrollment.
💡 Email Language: Your customers will receive emails in the language you set in your profile. To change your local language and the communication language for your customers, go to My Profile – Language.
Step 4 – Revenues Registration
Great job! You’re now ready to start tracking your revenues. There are two methods to track your revenues:
- Back office: when your students pay you at the reception directly and you need to register this payments as done
- Online: when your students pay you directyl from home via online payment systems.
First, when a student is enrolled in a class, the system generates a list of expected payments based on the class rates and assigned payment terms. This list can be viewed in two different formats:
- Class View: All payments made by students for the selected class
- Student View: Displays all payments across all classes for the selected student.
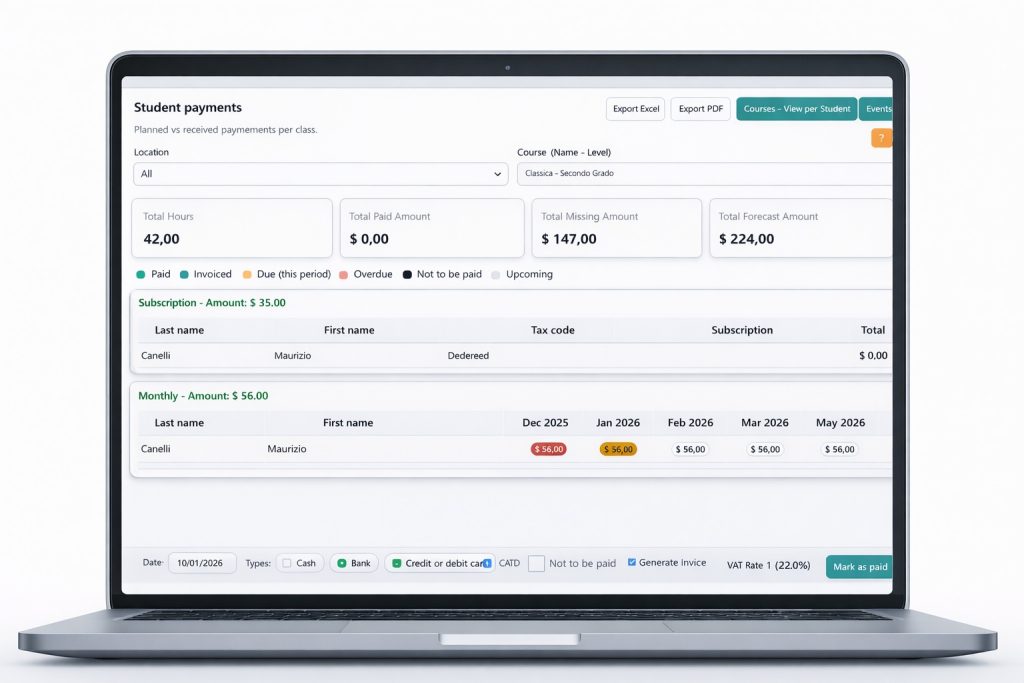
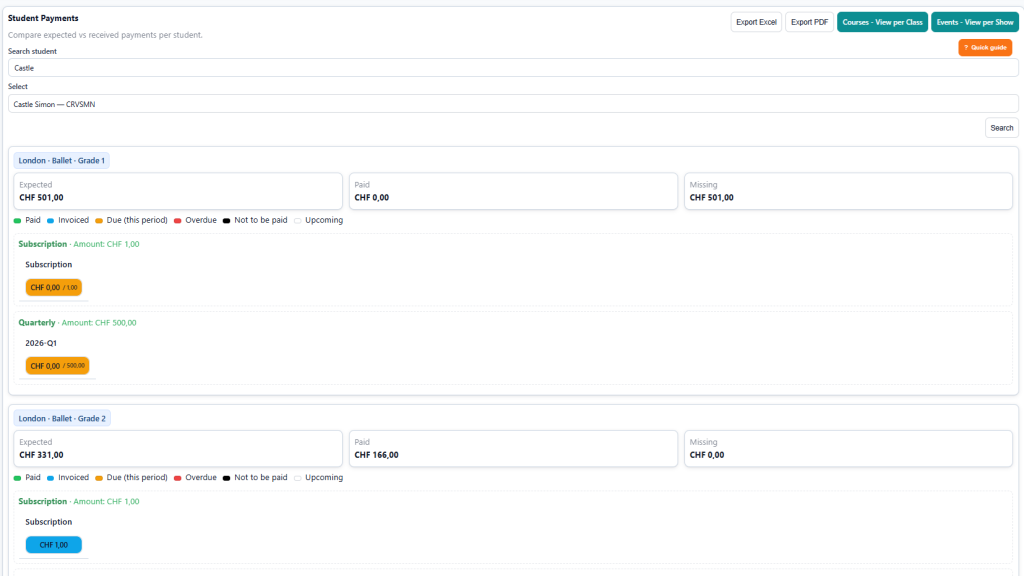
Track payments using Class View: navigate to Revenues > Student Payments > Course View by Class. Select the location and course to see a complete list of all expected payments for the entire course.
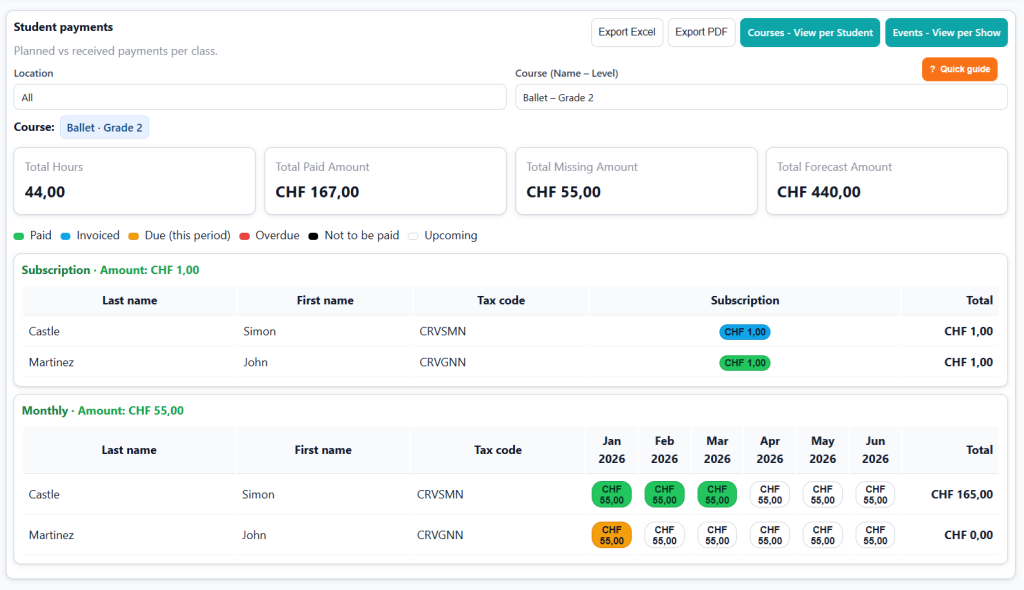
- Green : Paid
- Light Blue : Paid and Invoiced
- Orange: Payment Pending, Expected This Month
- Red: Overdue and expected to have been paid in previous months
- Black: Marked by You as Unpaid
- White: Upcoming Payments
You can select one or more cells for the same student to record a new payment.

The footer bar action lets you track and register new payments. You can also instantly generate an invoice from this action. However, please do not use this feature yet, as it will be activated once the invoice setup is complete. When you mark one or more cells as Paid, the cells will turn green. Clicking on an existing payment allows you to edit or delete it.
Track Payments Using Student View: Navigate to Revenues > Student Payments > Course View by Student. Locate and select the student to view all payments required from that individual across all courses.
You can use both views (Class and Student View) simultaneously.
In this way we have seen how to track collected payment from backoffice, But you like you can automate this process with Online Payment feature available in the platform. First of all check the Addon – Online Payment Setup to enable the portal to receive money from end customers directly into your Stripe account and Addon – Customer Portal to see main features on the customer web portal.
Once enabled your customer can access to their own page where all payments are tracked. From the same page they can run a on online payments. Once completed your backoffice page is automatically updated (the paid cell become green).
👉 Other Revenues: Besides the regular income from courses, you can also record additional revenue sources. Go to Revenues > Other Revenues to manually enter any other types of income from private clients, companies, or teachers.
Step 5 – Costs Tracking
The final step in the minimum setup involves cost management. After correctly setting up a teacher profile with their hourly rate and assigning the teacher to a course, the application will generate a monthly expected cost report. You can review this report, make any necessary adjustments, and then finalize the monthly cost report for each staff member.
Navigate to Costs > Instructors & Staff. Then, choose the period and the instructor. The list of expected payments will be displayed. You can select and confirm the automatically generated entries.
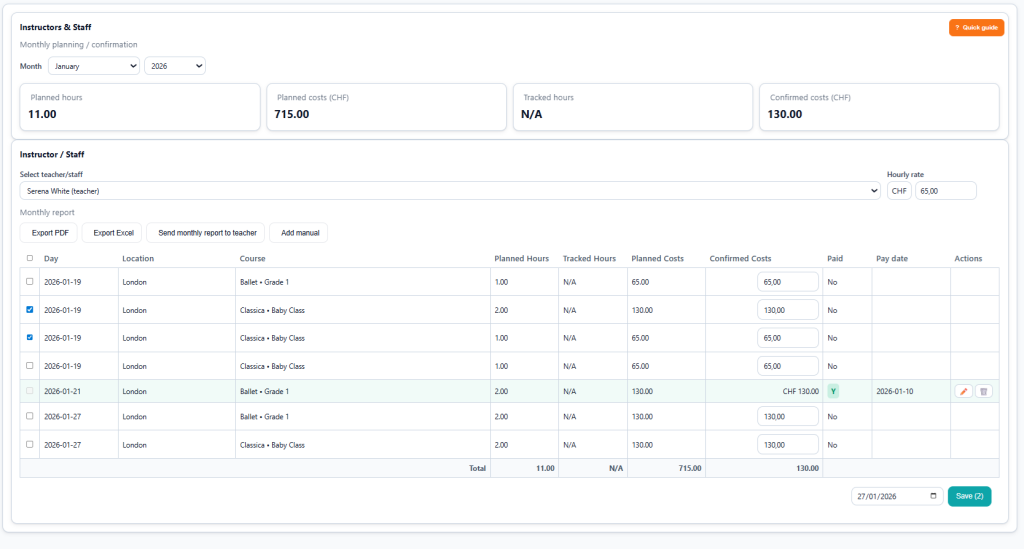
In addition to automatic lines, you can add manual costs by using the Add Manual button.
The monthly report for each staff member is available in PDF or Excel format and can also be automatically sent to the instructor’s email address.

👉 Differences between Planned Hours and Tracked Hours: Planned hours represent the estimated time a teacher is expected to spend based on the regular course schedule for the month. Tracked hours are the actual confirmed hours recorded by instructors using the Attendance Tracking module.
FAQ?
Here, you’ll discover clear answers to common questions about using Dance Master Pro, helping you navigate the app with ease.
How do I register a new student in the app?
Simply go to the Students tab and click ‘Add New’ to enter student details and save.
Can I send a reminder to a student about missing payment?
Yes, go to Student, select the student, and click on Details. Here, you will see an overview of the student’s information and can send the summary to the student via email by clicking Send Summary to Student.
How do I track payments from students?
Use the Payments feature to monitor transactions. If can also enable Stripe integration to collect payment via online by customer web portal.
I have lost my credentials. How can I recover my account?
Simple. On the login page, click the “Password Lost” link and follow the instructions to receive a password reset email.
The season is ended. How can I start a new season?
Go to Settings and scroll down until you find the Season Reset button. Please read the instructions and warnings carefully before proceeding.